Binaural dummy-head microphone [Part 4 – Ear canals, ear mounting, building a base]
Nearly done.
Ear Canals
Your ears will need ear canals. You should already have the tubing if you’ve used it to establish the size of the ear holes in your plaster cast and hence your silicone ears.
I used Jeff Anderson’s recipe, and it would be cheeky to just replicate it here, so do yourself a favour and go to his site where he will show you how to make ear canals. His whole tutorial is super useful and helped me a lot so bookmark that shit today.
Luckily, the Roland CS-10EMs fit perfectly into the canal. You’ll just need to cut a little notch to accomodate the housing. If you’re using different mics you’ll have to figure out a way to mount them, though I think most of these mics are of a similar size so you should have too much of a problem.
Mounting Your Ears
I cut plates from old CDs to serve as a kind of washer, to distribute the pressure from the nuts over the whole ear, rather then on the soft silicone risking pullthrough or damage. I used plastic bolts, washers and wingnuts to attach it like so:
Mount your microphones in the ears now.
Mounting Base
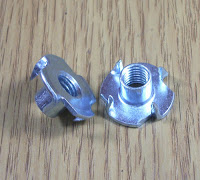
I built a wooden base for Frank so that he could be mounted to a tripod in the correct position. I established the correct angle for the head, and then using cardboard curled into a cylinder, formed a temporary base that would fit inside the big neck hole. I used this temporary neck to figure out the size and shape of the hole and used it as a template to cut 4 shapes out of plywood. I cut the centre out of 3 of them, recessed a hole in the 4th for a t-nut, and glued them together with wood glue.
Once dry I sanded it all down smooth and then had to make some slight adjustments to fit inside the neck properly. I used the appropriate sized t-nut to attach to the universal tripod standard in the base. I drilled 3 holes in the head around the neck, and used them as a template to mark and drill the same holes in the wooden base. I inserted smaller t-nuts in these holes, and then wingbolts through the holes in the neck to attach it to the base.
Blank Frank: The Binaural Dummy-Head Microphone
All done. You may want to draw a smiley face on yours. I stuffed Frank’s head with old tshirts to dampen any vibration through the fibreglass and avoid any stray sound travelling through the head. I’m going to experiment with proper sound-dampening foam at some point, but the t-shirts genuinely seem to work well.


